
A MacBook Pro Retina SSD is easily exchangeable for a bigger and faster model. There are currently two options that make sense:
NVMe: Cheap, high speed, a little risk
Third party OEM: fully compatible, a bit more expensive, easy to install
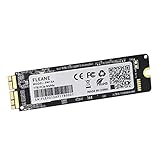
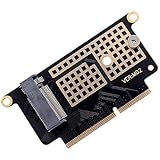
You can use a normal NVMe SSD with an adapter or a third party SSD from Transcend or OWC which are especially designed for your MacBook. NVMe SSDs are a lot faster, but may need some troubleshooting and configuration to make them run in your MacBook. Transcend and OWC SSDs therefore run immediately without any fuss but are slower and a bit more expensive.
Different model?
| MacBook Pro Unibody | MacBook Air | Upkeep Overview |
For older MacBooks it may be necessary to adjust the standby mode when using NVMe models, which can lead to a lower stand by time. There is also a little risk that you have to do some troubleshooting with individual configurations. If you want a solution that works immediately, you should get a Transcend or OWC SSD.
The shown SSD speeds show the maxima. Smaller capacities can have slower speeds, especially write speeds. Furthermore, the speeds depend also on your MacBook model. The linked adapters can look different than the ones in the picture, it is a newer generation.
For those in a hurry: Third Party Drives can now handle 1.600 MB/s – the simplest solution
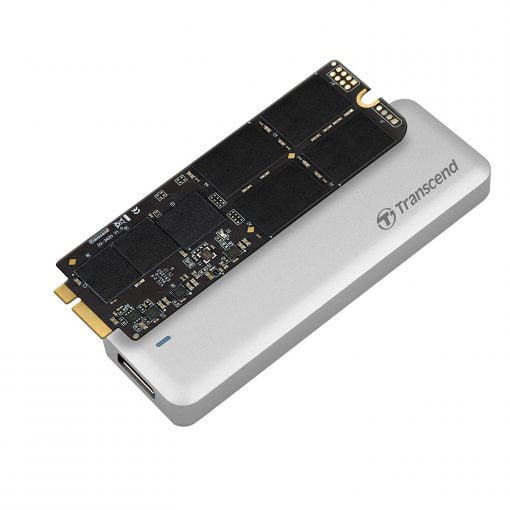
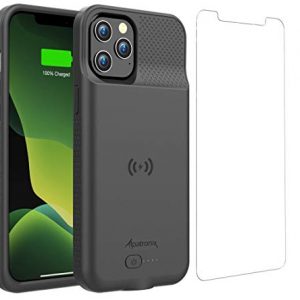
Transcend has released a faster version of its SSDs designed specifically for the Macs and MacBooks. These connect also to 4 lanes, so that the speed is 1,600 MB/s when reading and 1,400 MB/s when writing. So some of them are still slower than an NVMe variant with adapter, but the JetDrives are running at almost full speed and the performance difference to the previous version has been greatly minimized. The most serious disadvantage has been eliminated.
| Mac Year und Model | Transcend Model |
|---|---|
| all MacBook Pro Late 2013 - Early 2015 (11,1, 11,2, 11,3, 11,4, 11,5, 12,1) all MacBook Air Mid 2013 - 2017 (still sold) (6,1, 7,1) Mac mini Late 2014 (7,1) Mac Pro Late 2013 (6,1) | JetDrive 820 or 850 Versions 825 and 855 come with external enclosure for old SSD |
| all MacBook Pro 13" Late 2012 - Early 2013 (10,2) all MacBook Pro 15" Mid 2012 - Early 2013 (10,1) | JetDrive 720 JetDrive 725 |
| all MacBook Pro non Retina Late 2008 - Mid 2012 (5,1, 5,2, 5,3, 5,5, 6,1, 6,2, 7,1, 8,1, 8,2, 8,3, 9,1, 9,2) all MacBook non Retina Late 2008 - Mid 2010 (4,1, 5,1, 6,1, 7,1) all Mac mini Mid 2010 - Late 2012 (4,1, 5,1, 5,2, 6,1, 6,2) | JetDrive 420 |
| MacBook Air Mid 2012 (5,1, 5,2) | JetDrive 520 |
| all MacBook Air Late 2010 - Mid 2011 (3,1, 3,2, 4,1, 4,2) --Attention: 480/960GB JDM500 does not support MacBook Air 3,1-- | JetDrive 500 |
Nevertheless, the JetDrives are even more expensive than the normal SSDs plus adapters, but you don’t have to worry about some rare trouble. We have listed all compatible Transcend JetDrives in the table above. Transcend now also offers SSDs for the old Unibody MacBooks. That’s good, because there seems to be a trend towards longer use of the devices. However, we would simply buy cheaper SSDs from such old machines – every SATA model fits. Here is an overview for the old Unibody.

MacBook Pro Retina Late 2013, Mid 2014, Early 2015, Mid 2015 SSD upgrade
Suitable SSDs Model Number A1502 and A1398 and Model Identifier: MacBook Pro 11,1, 11,2, 11,3, 11,4, 11,5 and 12,1.

Under macOS High Sierra it is possible to use NVMe SSDs from other manufacturers (with the corresponding mechanical adapter). This has the advantage of high capacities at low prices. The 2015 models tolerate the SSDs without problems.
For the 2013 and 2014 models, the standby mode must be adjusted. More details in the instructions below.
Please pay attention to the 2013 model, whether it is one from the end of 2013 or from the beginning of 2013! The early 2013s support SATA SSDs, then please refer to the table below.
The 2013 model has a maximum speed of 700 MB/s, from 2014 on double and even higher. However, this speed can only be achieved with the adapter solution. OWC and Transcend SSDs can only read 800 to 950 MB/s, write a little less.

- Compatible with MacBook Air 11" & 13" (Mid 2013 – 2017), MacBook Pro Retina 13" & 15" (Late 2013 – mid 2015), Mac Mini (Late 2014), and Mac Pro (Late 2013)
- Up to 1, 600 MB/s Read; 1, 400 MB/s write
- Jetdrive 850 NVMe PCIe Gen3 x4 SSD inside a Thunderbolt enclosure
- Installation tools included
- Compatible with devices running macOS high Sierra (10.13) or later
| JetDrive 820 | Adapter | Amazon Link | |||
|---|---|---|---|---|---|
| 240 GB | not necessary | JetDrive 240 | |||
| 480 GB | not necessary | JetDrive 480 GB | |||
| 960 GB | not necessary | JetDrive 960 | |||
| OWC Aura | Adapter | Amazon Link |
|---|---|---|
| 240 GB | not necessary | n/a |
| 480 GB | not necessary | OWC 480 GB |
| 960 GB | not necessary | n/a |
| NVMe SSDs 250 GB | Adapter | Amazon Link | |||
|---|---|---|---|---|---|
| Kingston KC1000 | M.2 to Apple 2013+ | Kingston 240 GB | |||
| Western Digital Black | M.2 to Apple 2013+ | WD 256 GB | |||
| Intel 600p | M.2 to Apple 2013+ | Intel 256 GB | |||
| Samsung EVO 970 | M.2 to Apple 2013+ | Samsung 250 GB | |||
| NVMe SSDs 500 GB | Adapter | Amazon Link | |||
|---|---|---|---|---|---|
| Kingston KC1000 | M.2 to Apple 2013+ | Kingston 480 GB | |||
| Western Digital Black | M.2 to Apple 2013+ | WD 512 GB | |||
| Intel 600p | M.2 to Apple 2013+ | Intel 512 GB | |||
| Samsung EVO 970 | M.2 to Apple 2013+ | Samsung 500 GB | |||
| Samsung PRO 970 | M.2 to Apple 2013+ | Samsung 512 GB |
| NVMe SSDs 1 TB | Adapter | Amazon Link | |||
|---|---|---|---|---|---|
| Kingston KC1000 | M.2 to Apple 2013+ | Kingston 960 GB | |||
| Western Digital Black | M.2 to Apple 2013+ | WD 512 GB | |||
| Intel 600p | M.2 to Apple 2013+ | Intel 1 TB | |||
| Samsung EVO 970 | M.2 to Apple 2013+ | Samsung 1 TB | |||
| Samsung PRO 970 | M.2 to Apple 2013+ | Samsung 1 TB |
| NVMe SSDs 2 TB | Adapter | Amazon Link | |||
|---|---|---|---|---|---|
| Samsung EVO 970 | M.2 to Apple 2013+ | Samsung 2 TB | |||
| Samsung PRO 970 | M.2 to Apple 2013+ | Samsung 2 TB |
Transcend and OWC solutions are for you if you just want to upgrade your memory and don’t want to invest time in possible troubleshooting. These SSDs models just work:
NVMe SSDs are state of the art. The Kingston HyperX AHCI model became more expensive than the newer models in the meantime. It is listed here only for a complete picture.
| HyperX Predator | Adapter | Amazon Link | |||
|---|---|---|---|---|---|
| 240 GB | M.2 to Apple 2013+ | Kingston 240 GB | |||
| 480 GB | M.2 to Apple 2013+ | Kingston 480 GB | |||
| 960 GB | M.2 to Apple 2013+ | Kingston 960 GB | |||

MacBook Pro Retina Mid 2012, Early 2013 SSD upgrade
Suitable SSDs Model Number A1398 and A1425 and Model Identifier: MacBook Pro 10,1 and 10,2

We mention it again: Users of 2013 models should check twice if they got an Early or a Late 2013 machine. The difference lies in the mechanical adapter necessary as well as in the type of SSD.
The situation is further complicated by Apple’s choice to make the SSDs in this model rather wide than long. This gives you two options: You can use a M.2 to MacBook Pro 2012 adapter or a mSATA to MacBook Pro 2012 adapter. The speed delivered by matching SSDs is the same, as both base on SATA. The key difference is the maximal size of usable storage. As M.2 SSDs are only allowed to be 60mm long in this case, the biggest available model is 500 GB. If you are searching for more capacity than that, you have to choose the mSATA adapter and a mSATA SSD. In the following tables you can find matching combinations.
| SSDs 250 GB | Adapter | Amazon Link |
|---|---|---|
| Transcend MTS600 | M.2 to Retina 2012,3 | Transcend 256 GB |
| Samsung Evo 850 | mSATA to Retina 2012,3 | Samsung 250 GB |
| Kingston SMS200 | mSATA to Retina 2012,3 | Kingston 240 GB |
| OWC Aura | not necessary | OWC 240 GB |
| SSDs 500 GB | Adapter | Amazon Link |
|---|---|---|
| Transcend MTS600 | M.2 to Retina 2012,3 | Transcend 512 GB |
| Samsung Evo 850 | mSATA to Retina 2012,3 | Samsung 500 GB |
| Kingston SMS200 | mSATA to Retina 2012,3 | Kingston 480 GB |
| OWC Aura | not necessary | OWC 480 GB |
| SSDs 1 TB | Adapter | Amazon Link |
|---|---|---|
| Samsung Evo 850 | mSATA to Retina 2012,3 | Samsung 1 TB |
Again, solutions with adapters allow for a cost effective upgrade. Devices made by OWC and Transcend come without the need for an adapter piece, are therefore more expensive tough.
- Compatible with 13" MacBook Pro Retina Display. External Dimension: 110.9mm x 37.2mm x 10.8mm (4.37" x 1.46" x 0.43")
- Next-generation SATA III 6Gb/s interface
- Free download of Jet Drive Toolbox SSD monitoring software
- External enclosure is fully compatible with SuperSpeed USB 3.0 & Hi-Speed USB 2.0
- SSD upgrade kit included, Repurpose original SSD into external SSD
- Operating Temperature 32F-158F
- Dual color LED indicator (Power, data transfer and USB 3.0/2.0 connection)
| Transcend JetDrive 720/725 | Adapter | Amazon Link |
|---|---|---|
| 240 GB for Retina 13" | not necessary | JetDrive 240 GB |
| 480 GB for Retina 13" | not necessary | JetDrive 480 GB |
| 960 GB for Retina 13" | not necessary | JetDrive 940 GB |
| 240 GB for Retina 15" | not necessary | JetDrive 240 GB |
| 480 GB for Retina 15" | not necessary | JetDrive 480 GB |
| 960 GB for Retina 15" | not necessary | JetDrive 940 GB |
If you decide to buy the Transcend JetDrive please notice that they differentiate between 13″ MacBook (JetDrive 720) and 15″ model (JetDrive 725).
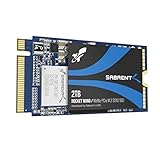
Upgrade MacBook Pro Retina SSD: 2016, 2017
Suitable SSDs for MacBook Pro A1708 – Model Idendifier: MacBook Pro 13,1 and 14,1
The MacBook Pro from 2016 and 2017 with function keys instead of the Touch Bar can still be upgraded as the last MacBook produced. Since the price difference is not very big anymore, we would go for the OEM replicas.
- Supports for 2230/2242 Type Key-M NVME M.2 SSD, NOt Compatible with SATA bus key B/B+M SSD (NOT Fit for 2260/2280).
- Compatible with MacBook Pro A1708 Late 2016 Mid 2017 ONLY, Plug and play, NO driver and No additional power required.
- Attention: Turn OFF the power and Remove the battery before installation.
- Connector PCI-e type: 22-pin+34-pin.
- Each Pack come with 1x M.2 NGFF 2230 2242 adapter (SSD Adapter).
- M.2 PCIe Gen3 x 4 Interface. PCIe 3.1 Compliant / NVMe 1.3 Compliant.
- DRAM-less Low Power Consumption. Power Management Support for APST / ASPM / L1.2.
- Supports SMART and TRIM commands. Supports ONFi 2.3, ONFi 3.0, ONFi 3.2 and ONFi 4.0 interface.
- Advanced Wear Leveling, Bad Block Management, and Over-Provision.
- All Sabrent SSDs come with FREE Sabrent Acronis True Image for Sabrent Software for easy Cloning.

- Original SSD for Macbook Pro Retina A1708 2016 2017 Year
- We have good after-sales services.
- We share the latest information of laptop spare parts in Chinese market with all our customers
- This is NOT an easy job for someone who has no technical skills with Disassembling or Assembling laptop, So only purchase this item if you know how to install it.
- Each SSD is tested before shipping and working .
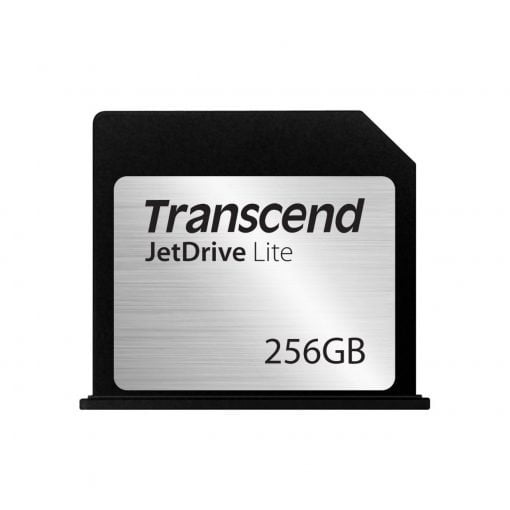
Expand MacBook Pro Retina 2012 – 2015 and 2021 with memory for the SD card slot
Suitable memory for all MacBook Retina with SD card slot

You want more memory, but you don’t want to use the screw driver? Then there’s a smart alternative for the MacBook Retina’s 13″ and 15″ SD card slot. Transcend offers memory expansions that can easily be plugged into the slot for the SD card and still offer up to 95 MB/s speed. The expansion is available in 64, 128, 256, 512 GB and 1 TB capacity and also works in 14″ and 16″ MacBook Pros.
If you want to save or have even more capacity (up to 400 GB current), you can also buy an adapter and the matching micro SD card separately. Then for 200 GB storage only pays around 60 dollars, for 400 GB as micro SD card you’ll pay around 160 dollars.
| MacBook Pro Retina Model | Capacity | Amazon Link |
|---|---|---|
| 14 & 16 inch: 2021 | 64 GB - 1 TB | JetDrive Lite 330 |
| 13 inch: Late 2012 - Early 2015 | 64 - 512 GB | JetDrive Lite 330 |
| 15 inch: Mid 2012 - Early 2013 | 64 - 512 GB | JetDrive Lite 350 |
| 15 inch: Late 2013 - Mid 2015 | 64 - 512 GB | JetDrive Lite 360 |
| SD adapter for various models | Micro-SD-card | Adapter |
Backup your MacBook Pro Retina
Not only is a backup a basic obligation when upgrading your Mac, it should be an everyday task to help prevent loss of your important data. If you are exchaning a still functioning SSD for a new one, a bit of preparation makes the life a lot easier.
Always important:
Unplug the device and remove the power supply!
We don’t wanna get in contact with electricity and safety is always first.
Option 1: Data Migration via Internet Recovery und Time Machine Backup

This Option is the easiest, but you’ll need a fast internet connection, a bit of patience and a new Mac that is capable of Internet Recovery. Is your machine from 2009 or older, this option does not exist for you. Users of 2010 and 2011 Mac can update their Firmware first. Newer Macs are all capable of Internet Recovery.
If you decide for this option, you just fit the new SSD like in the instructions below and then start the Mac white holding cmd + alt + R. Internet Recovery starts and you can install macOS on your newly installed SSD. After that, you get your data back via your Time Machine backup.
Option 2: Bootable macOS und Time Machine
If your Mac is too old for Internet Recovery or your internet connection is way to slow it can be more helpful to make a bootable medium, like a USB Stick or SD card first. With that, you can download everything first and when you start installing, the installer starts immediately from the bootable medium.
If you have a bootable USB stick for example, you plug it in, after you installed your new SSD. When you switch it on for the first time, press the alt-key. This shortcut lists all your possible boot devices. Choose your installation medium. Before you start installing macOS, it can be necessary to format the drive first via Disk Utility.
During the installation of macOS you will get the chance to play back your saved data from Time Machine.

Option 3: Clone your drive first

This option is for all those who want to invest the time for copying date before changing the drive. When you would like to do that, please be aware that you will need an external USB enclosure for your M.2 SSD (or other format that you decide to buy).
After connecting it to the Mac you need to first format it via Disc Utility. You find it in Programs > Utilities > Disk Utility. The correct format is “Mac OS Extended Journaled”.
Then, you can clone your internal SSD 1:1 onto the external new one, which will soon change places. Programs for this task are Carbon Copy Cloner or SuperDuper.
Replace SSD in a MacBook Pro Retina – Preparation
First thing you do before accessing the internal SSD of the 2015 model is removing all the screws from the underside of the MacBook. Don’t be too afraid: they are only a few and it really is easy. You will need the following two screwdrivers for the upgrade process:
- one TS4 Pentalobe screwdriver for the bottom screws
- one Torx T5 for the screw holding the SSD in place
The good thing is, that the adapters mentioned above should come with these two screw drivers. So you can start right away. The Pentalobe one for the external screws looks like a five point star, the Torx one for the SSD like a six point star.

Tip: Make a little drawing on paper to remember the screws positions on the MacBook. They may have different lengths, and this makes it easer to build everything back together.

After you removed all the screws, just take the backplate off. you will now see the inner construction of the machine. The fist step to do is to disconnect the battery. Pull up the connector on the right side and don’t get fooled by Apple’s warnings.
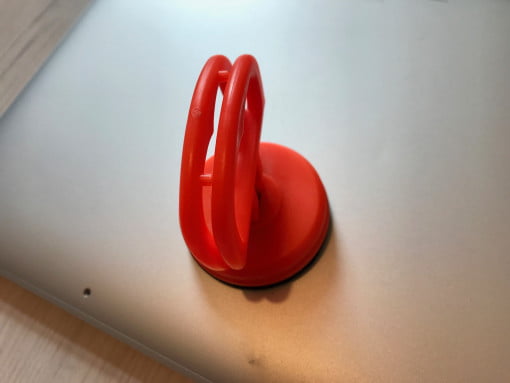
If you have a 2016/17 model, you also need to use a suction cup. This is sucked in on the side without the hinge – you can then use it to slightly lift the base plate and then carefully pull it parallel away from the hinge, so do not simply lift it up!
Then remove the Torx screw of the battery that is directly above the trackpad and bend the connector a bit to the side.
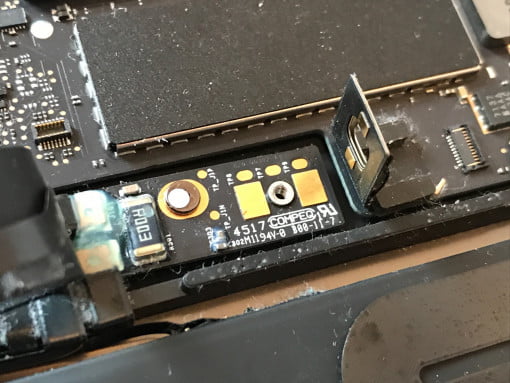
If you want to be absolutely sure then cover the electrical contacts with some tape as well.
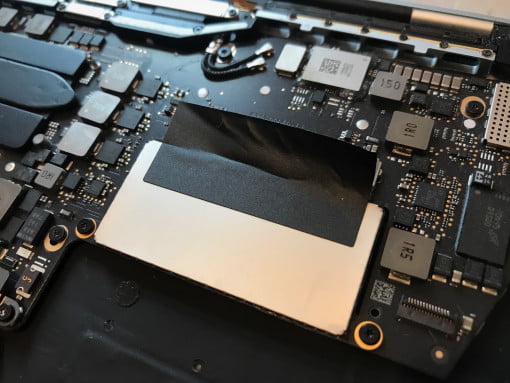
Before installing the SSD you should check the metal plates on both sides as described here. Then move on to the appropriate model year of your MacBook Pro:
.Instructions: Replace your old SSD for the new one (2015)
1. Loosen the SSD screw
The actual SSD change is more than simple: unscrew the one screw holding in the original SSD place.

2. Remove the old SSD
Just use the Torx screwdriver and then pull the original SSD carefully out of its socket.

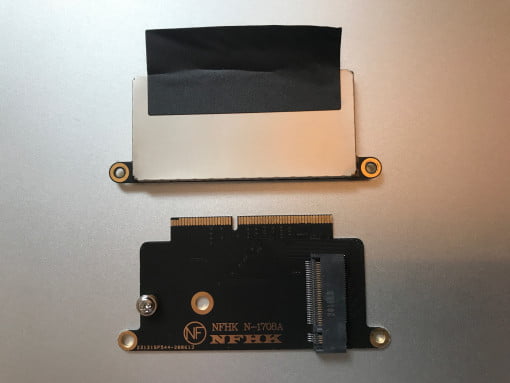
3. Insert the SSD Adapter
Perfect! You can now use it otherwise. Now assemble the adapter: push it into the socket parallel to the logicboard. If it is positioned correctly, push it in with a little bit of force, until it connects fully with the metal part (see pictures).
You can skip this step, of course, if you decided for a Transcend solution, that does not need an adapter.


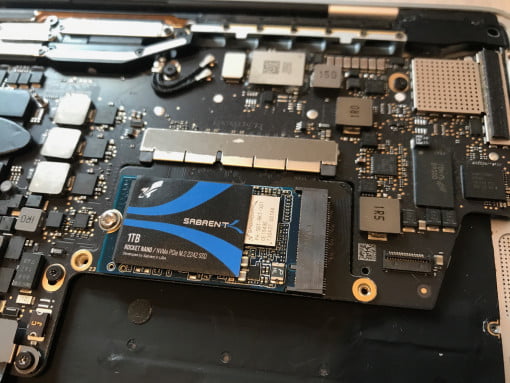
4. Insert the new SSD
Now insert the new M.2 SSD under a 45 degree angle and push it down. The little gap at the end of the drive should fit perfectly over the screw’s socket.

5. Re-fit the screw. Done!
Refit the screw to fix the new SSD in its socket. Make sure it is tightened just enough, but don’t overdo it!

Instructions: Replace your old SSD for the new one (2016/17)
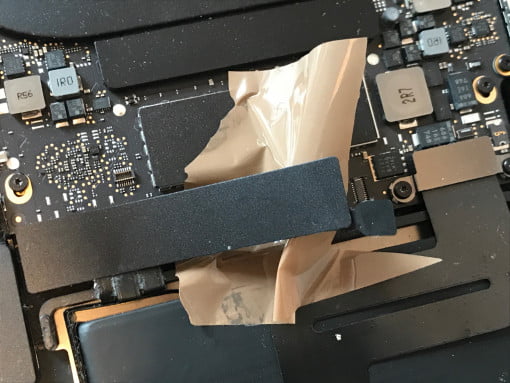
1. Remove loudspeaker cable
The actual replacement of the SSD is simple, but we have to remove the speaker first before the SSD can be removed.

2. Removing the speaker
When the Torx T4 screw is loosened, you can easily remove the speaker.

3. Removing the old SSD
To do this, loosen the two T5 screws as well as the tape on the SSD. Try to loosen it carefully (it’s annoying, yes) so you can reuse it on the new one. Ideally, you loosen the part on the SSD and leave it stuck on the adapter (so opposite to the picture).
Then pull out the SSD parallel to the board towards the front.
4. Insert new SSD or adapter + SSD
Now you can use an adapter with an SSD or an OEM SSD.

Slide the SSD back into the slot in parallel, tighten the screws, and reapply the tape if necessary.
5. Reinsert loudspeaker

Then reinsert the loudspeaker. Do not forget the cable. Done!
Don’t forget to reconnect the battery before you put the bottom plate back on again. Screw on the Pentalobe screws. They should go in easily and only at the end tighten. If they go in heavily, remove them and try to fit them with a bit of an angle.
The pictures above show a MacBook Pro Retina 13″ Mid 2013 – 2015. If you own a 15″ model, you will find the SSD below the left fan. Als instructions are exactly the same though, as the SSD drive is identical.
If you own a 2012 or Early 2013 model, you will find the SSD below the trackpad. Here is a video for those models:
First Boot, Formatting the new SSD
Now is the time to boot your MacBook for the first time and format the new drive (unless you have cloned the data before, see above). So you start the machine and while the chime sounds, you press alt + cmd + R for Internet Recovery or just alt if you have prepared a bootable drive to start from. In any case, you will find yourself in the menu for the OS X/macOS Utilities. The fist option to choose is the Disk Utiliy:

There you can find the new drive. Click on it on the left side and then choose “Erase”. If you have an older Mac it looks like this:


Newer machines do show the following design:

For a name you can use the classic “Macintosh HD”. Filesystem must be “macOS Extended (Journaled) and scheme should be “GUID Partition Map”. After a short period of time, the formatting should be done.


Now the new drive is usable. Close Disk Utility and begin installation of OS X or macOS or recover your data via a Time Machine backup.


Thanks for such detailed information. I am wondering if the later model Intel, WD and Samsung SSD card work the same?
https://amzn.to/2TTpCyY
https://amzn.to/2TPtvVw
https://amzn.to/2MhPeTn
Hi Chun-Chien,
thanks for your kind words. Yes, these should also work as they are NVMe models. We haven’t tested them though. The Samsung might run a little hotter than others. But in the end, you should not run into more problems than with previous generations of these models.
Let us know what your experiences are, when you have upgraded! Feel also free to post a few pics in our forum to share your experience!
Thanks a lot,
Stephan
Hi, Stephan,
Thanks for your quick response. I have decided to give Western Digital Black 1T SSD card a try. Will share my experience once I have upgraded successfully.
Best,
Chun-Chien
That sounds great, thank you! Much fun and success while upgrading!
Hi, Stephan,
I finally got my Western Digital Black 1T SSD card installed. It runs perfectly with read/write speed at around 2,600 MB/s. Thanks again for your detailed information!
Best,
Chun-Chien
Hi Chun-Chien,
great to hear! Thank you very much for your feedback, it helps a lot!
Thanks,
Stephan
Hello ,
Thanks for the tutorial . I would like to ask if is it possible to use m2 sata ssd instead of m2 nvme ssd on macbook pro 2015 early ? so far i couldnt find any adapter for it .
Regards ,
Selçuk
Hello Selçuk,
thanks for your kind words. No, that is not possible. Although they might fit mechanically, the newer MacBooks use NVMe as a protocol for the SSD and therefore need such a model.
Best regards,
Stephan
Thanks,I will go for nvme ones then .
Cheers.
Hello guys, I looked all over the internet and I don’t find any information on how to upgrade my “MacBook Pro (13-inch, 2016, Two Thunderbolt 3 ports)” (without touch bar). It looks like you all stop at the 2015 edition.
Can you help me ? I’m afraid to buy the wrong ssd..
Thank you !!
Hello Charles,
sure thing! Yours is the only one of the newer TB 3 lineup where this is possible. This is the SSD fitting in your model:
http://s.click.aliexpress.com/e/_dZEcymJ
Let us know how it went!
Best,
Stephan