If you want to use your iPhone battery for as long as possible, you should prevent it from constantly being fully discharged or charged to 100%. It is in these areas that the battery will age the fastest. It is ideal to keep the state of charge around the 50% mark if possible. That means putting the iPhone on a wireless charger whenever possible, for example. These frequent small charging steps are not harmful, only the use of the very low and very high charging levels.
Remind yourself when to charge the battery
If you want to have the chance to plug in the charging cable when the charge level is 20% and remove it again when it is over 80%, you can simply let the iPhone itself remind you to do so. It is extremely practical in everyday life. Of course, this isn’t possible in every situation and shouldn’t become a religion either, but if you’re at home and have the opportunity this is a very simple and extremely effective way to greatly increase the lifespan of the internal battery.
Many will now say that they always need the 100% charge level. With this assumption, however, it should always be clear that the 100% always refers to the health of the battery, which continues to decrease with conventional use. So if you have a battery with a battery health of 90%, then it is 100% charged, but the total capacity is already 10 percent below the original capacity. If you stick to the 20/80 rule, there is only a 10 percentage point difference. But you have another advantage: because the battery wears out less quickly, you can fully charge it on days when 100% charge is really important and then fall back on a battery that still has almost 100% capacity. On average days you charge between 20 and 80 percent and prevent premature wear of the battery.
Create battery reminders with iOS Shortcuts app
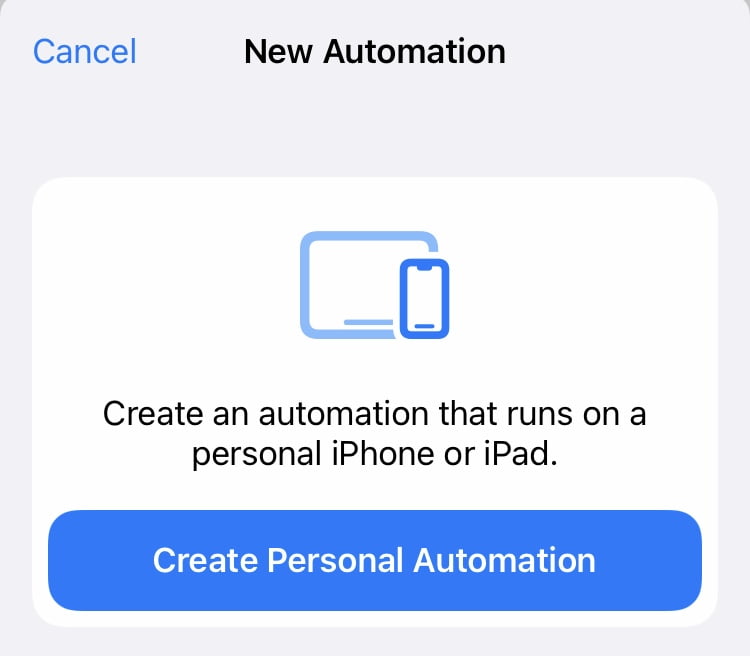
We use Apple’s App Shortcuts for small notifications when the charge level is below 20% and above 80%. Tap on the middle option Automation and then on the Plus in the top right and select “Create Personal Automation”.

Now select the option “Battery Level” and set 20 percent and “Falls Below”


Then under Add Action > Scripting select the option “Show notification”. You can now replace the default “Hello World” with a text of your choice, for example a simple “Charge!”. If you put about 25 spaces in front of the word, you will recognize your own message in the notification even more easily, since the note is moved a little to the right.


In the next step, you should definitely switch off Confirm before execution – otherwise the automatic execution will not take place automatically and therefore makes no sense.

Then you do the whole thing again, this time with the setting “More than 80%” and the message text “Unplug!”.

Now you have two automations that generate a message when the battery level falls below 20% or exceeds 80%. The information text is accompanied by a small “Pling”. So it’s a handy little hint that’s not annoying. So if you don’t have a chance to charge you can continue to use the iPhone without constant notifications. Likewise if you want to charge up to the full 100%.
The bottom line is that with hundreds to thousands of charging processes, this should drastically extend the life of your battery.
How would I go about programming this notification to trigger a smart plug (turning itself on at >20% or off at <80%)
Hi Nadia,
for a switching off a connected charger I guess? 🙂 Good question!
This should work: instead of adding the action with the notification you add (or later edit the above shown complete automation) a HomeKit control action. Therefore you switch from “Categories” to “Apps” when you add a new step. Then you search for the “Home” app and then the option to control your individually named smart home. Then you get a new step in which you can choose your smart plug and its state.
The 20% and 80% thresholds stay the same. You just replace the notification action by the HomeKit control action. Or you just add it, so get can switch the plug *and* get the notification.
Hope that helps 🙂
Stephan